How to use a press tool
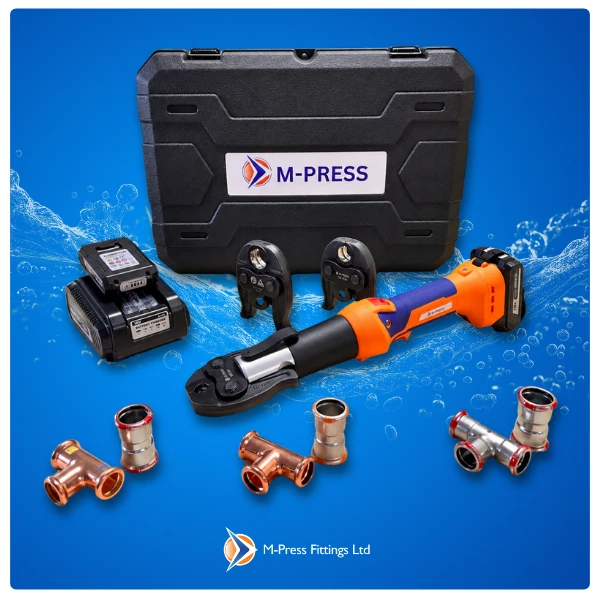
What is a press tool?
Press tools, jaws, slings and fitting profiles explained
Press-fit systems make pipe installation faster, safer, and more consistent without the need for hot works.
In this guide, we’ll show you how to find the correct press tool for your installation, use a press tool properly, avoid common mistakes, and keep your equipment maintained for reliable, long-lasting performance
A press tool is a powered tool that uses specialised jaws to mechanically compress a press fitting onto a pipe, creating a leak-tight connection.
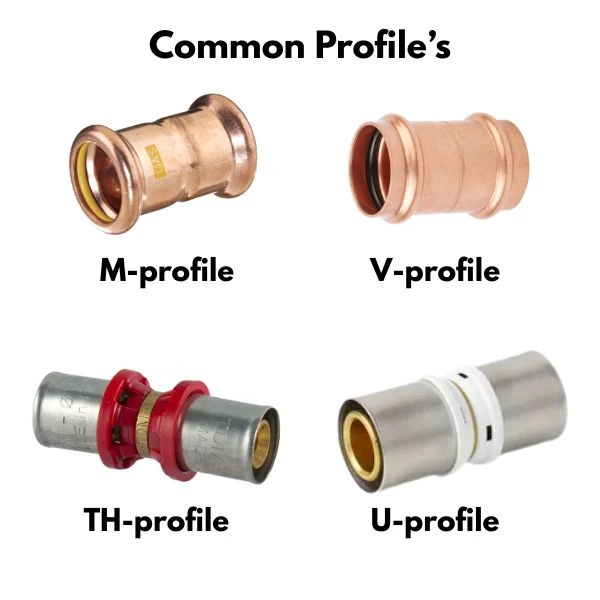
Only press fittings can be used with press tools. Press fittings each have their own profiles which match the jaw used on the press tool. For example, you must use M-profile fittings with M-profile jaws.
Press tools are powerful and can put out a force from 19kN up to 32kN depending on the tool.
(kN = Kilonewtons, a metric unit of force equal to 1,000 newtons)
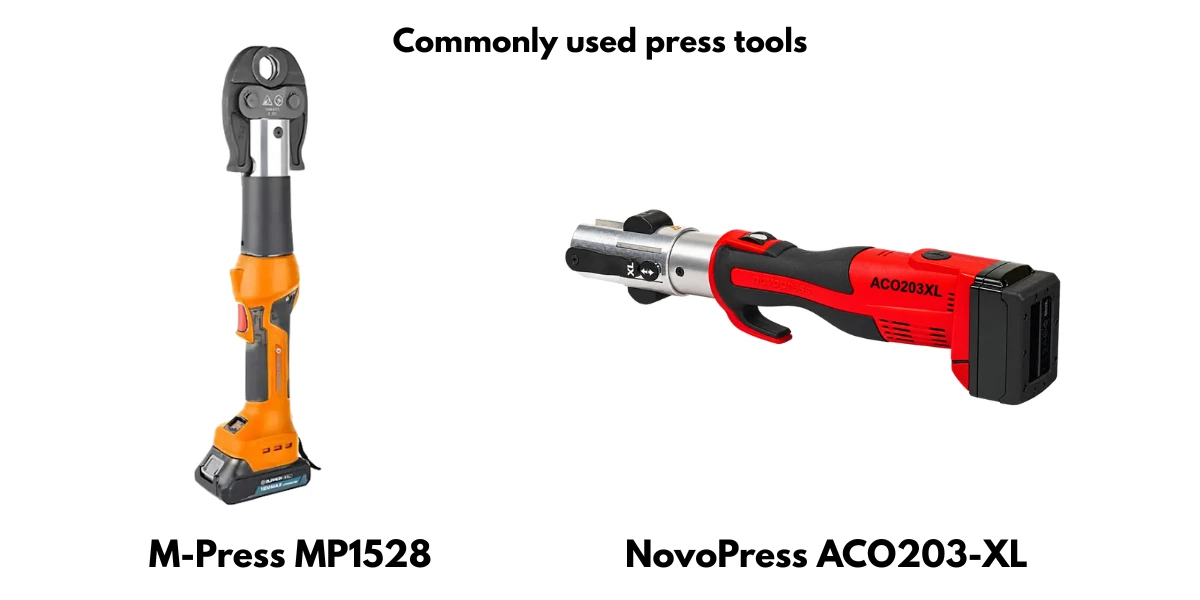
A range of press tools are available to suit different applications. Some are designed for smaller domestic installations, such as the M-Press MP1528, which delivers 19 kN of force. Others are built for larger industrial applications, such as the Novopress ACO203 XL, which delivers up to 32 kN of force.
Jaws and slings are also designed for specific fitting materials and sizes. Always check the press tool specifications before purchasing to ensure compatibility.
Inside the fitting, an O-ring forms a seal around the pipe. O-rings can be changed depending on the application, but fittings already come with the correct seal for their intended use. For example, Water Gas fittings are supplied with HNBR seals. The O-ring should not fall out, but it is always worth checking that it is correctly fitted before pressing the fitting.
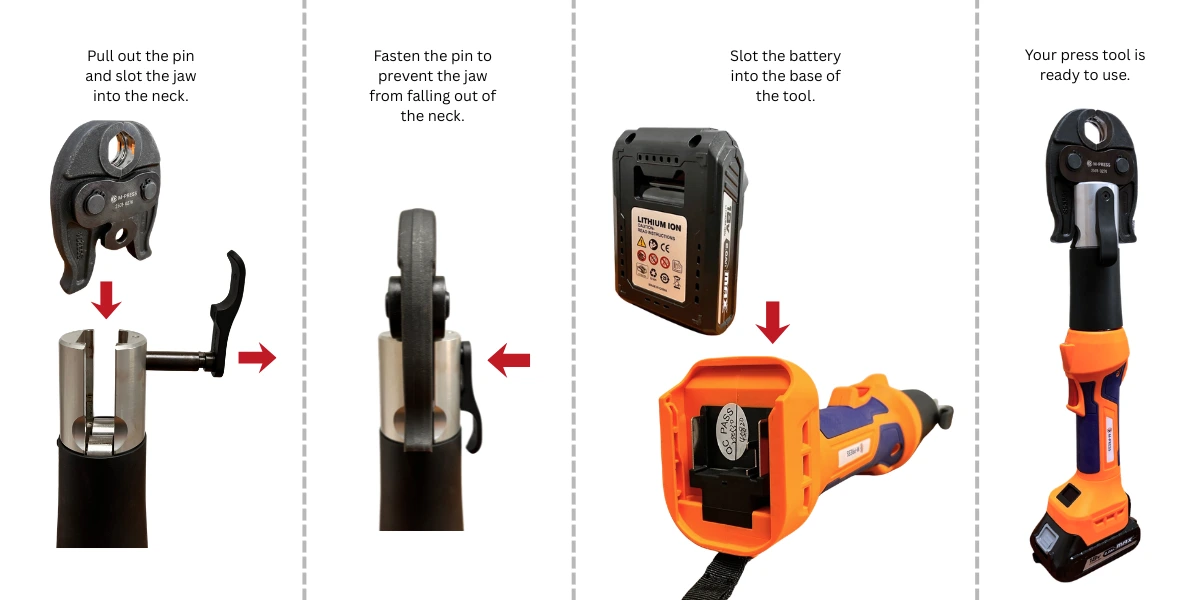
How to Assemble A Press Tool
When you receive your press tool, it will likely require some assembly. Follow these steps to set it up correctly.
How to Press a Fitting With a Press Tool
What is the Difference Between a Jaw, Sling, Collar and Adapter?
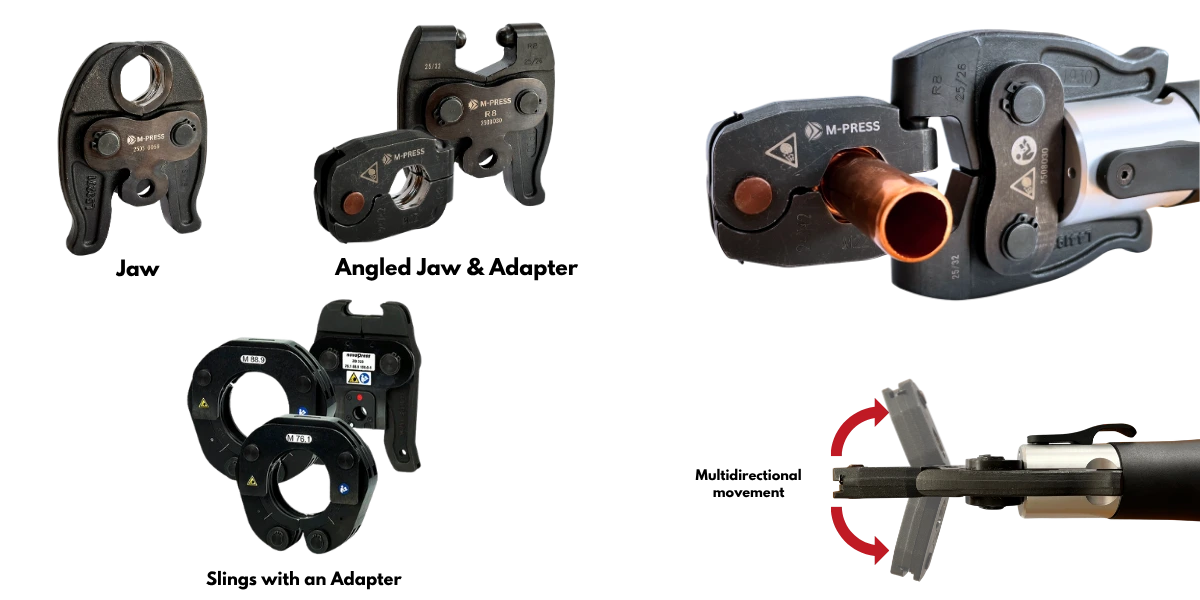
When assembling your press tool for the first time, the additional jaws and slings (also called collars) can be confusing. Standard jaws attach directly to the press tool and clamp around the fitting.
Slings are used on fittings that are 42mm and above, where press jaws can no longer be used. The sling allows these larger fittings to be pressed correctly. When using a sling, place it around the fitting first. The adapter then connects the press tool to the sling, allowing it to press the fitting.
Angled jaws are combined with their own adapters, similar to slings with their adapters. However, and angled jaw has ability to pivot which allows you reach those awkward angles a regular jaw can’t.
How to Prepare Copper Pipe
After setting up your press tool, you’ll need to prepare your pipe ready for pressing the fitting onto.
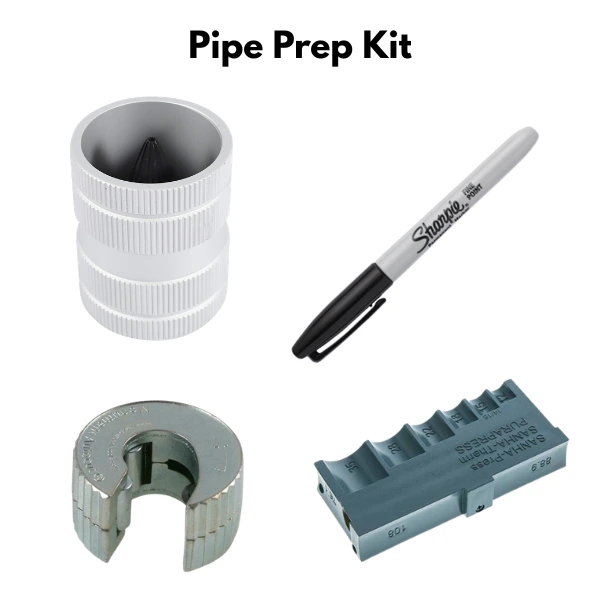
Start with a visual inspection of your pipe to ensure there are no dents or deep scratches on the surface which will get pressed with the fitting. If you don’t remove them, they can increase the chances of a leak.
Once you have confirmed the pipe is in suitable condition you can proceed to cutting the pipe using a pipe cutter rather than a hacksaw, as a poor cut can affect alignment inside the fitting.
Next, deburr the cut end to remove any sharp edges or burrs that could damage the O-ring and lead to premature leaks.
Once the pipe is smooth, use a depth gauge and marker to mark the correct insertion depth. This allows you to check that the pipe remains fully inserted, as it can move out of position while you work. Once the pipe is prepared and marked, you are ready to complete the press.
Pro tip: Use different deburring tools for specific metals. For example, have one deburr tool only for copper and one for steel. This avoids mixing metals together which can damage your pipe when deburring.
How to Check if a Press Fitting has Sealed?
Basic Checks
You’ve spent the money to get the tools, fittings and pipe ready to press. The last thing you want to do is start squashing your fittings and have no idea why it happened. Its good to know the do’s and don’ts to avoid a costly mishap.
If your press was unsuccessful, refer to your basic checks.
- Did you follow the all of the pipe prep steps?
- Have you used the correct profile jaw and fitting?
- Did you align the jaw to the fitting correctly?
- When was your tool last calibrated?
Not calibrating the tool will impact how effectively your press tool will be able to press a fitting. - Have you cleaned your jaws recently?
Excess metal built up from previous presses will warp the shape of the fitting. You can clean your jaws with a dry lubricant, the same type of dry lubricant you use to clean bike chains.
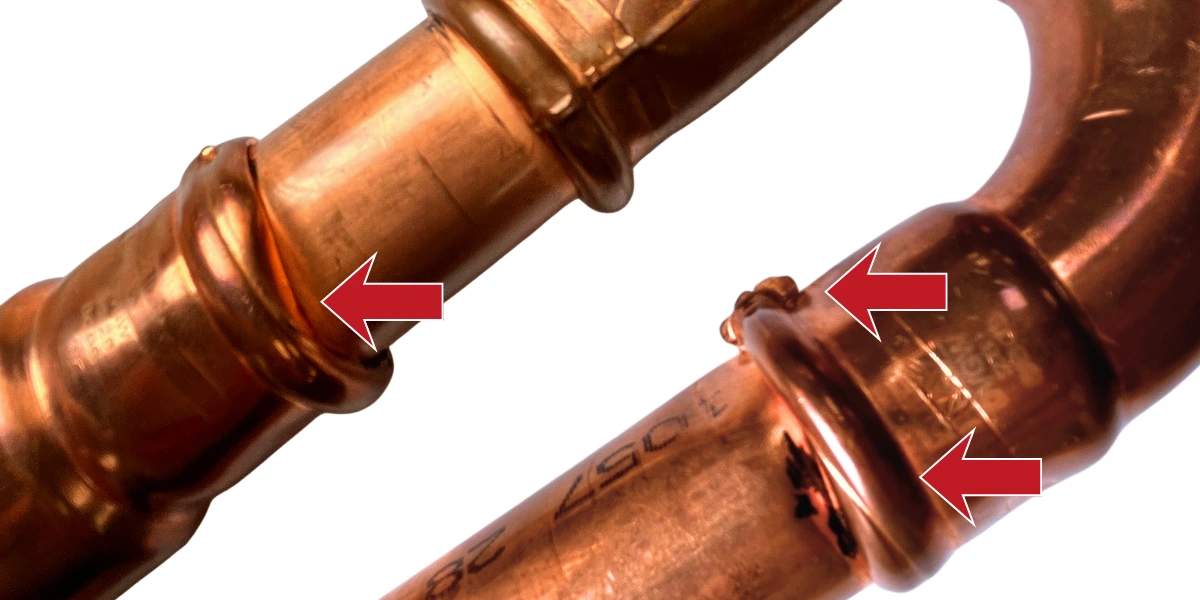
Once you’ve learnt the press process and know how to identify a good and bad press, you’ll avoid extra work and costs down the line. If your fittings appear misshapen or have exaggerated pinch points with flared edges, your press has not been successful.
Pro tip: Its common for a pressed fittings to have small pinch points, especially on new jaws as they ‘bed in’. Exaggerated pinch points are usually the result of dirty jaws which regular cleaning can fix.
Why Does a Press Tool Need Calibrating?
An important process needed to help your press tool be fully operational. With continuous use of your press tool, the tool will need a little maintenance to ensure it always puts out the correct amount of force in order to effectively seal press fittings. When renting a press tool or purchasing one, its required for a press tool to pass calibration to ensure it is suitable for operation.
Each press tool has a recommended service interval. For example, the MP1528 should be serviced every 10,000 press cycles and is covered by a two-year or 30,000-cycle warranty, whichever comes first.
Some press tools even come with Bluetooth included designed to be compatible with their respective apps. They allow you to track presses and some apps will notify you when your tool is due for calibration.
Speak to your retailer about how and where to book in your press tool for calibration.
Pro Tip: For free press tool training and calibration queries, we recommend contacting M-Press Ltd
How to Maintain and Clean a Press Tool
Excess dirt & debris can impact the quality of your sealed press fitting. Overtime as you press more fittings, excess metal will build up on on the jaws and down the neck. Both of which can effect the functionality of the tool too. But this is easily fixed buy cleaning the jaw and inside the neck.
Always make sure you remove the battery before you begin cleaning the tool otherwise you’ll be sat in A&E for a few hours and no one wants to do that.
To clean the jaw you’ll need a dry lube and a rag or sponge with a scourer on to remove the dirt and metal.
To clean down the neck, the aim is to lightly brush off excess dirt and debris from the surface of the rollers with a dry fine bristled paint brush. Tipping the tool upside down as you do this will make the task easier.
Do not use oils or WD40 as they can seep inside the tool and damage the circuitry which may also invalidate the warranty.
Which press tool should I buy?
You may already have a press tool in mind.
As mentioned earlier, different tools are designed for specific fitting sizes.
More powerful press tools generally cost more, so the right choice depends on the work you need it to handle.
The MP1528 press tool provides professional pressing performance without the premium price:
- Priced at £615 ex VAT
- Two-year or 30,000-cycle warranty
- Fast 2.4-second pressing cycle
- 350° rotating head
- Supplied with 15mm, 22mm and 28mm M-profile jaws
- Pressure output of 19kN
- Service interval of 10,000 press cycles
- Brushless motor
- 1 safety strap
- 2 batteries and 1 charger
- 1 carry case
Battery options
Option 1. For £615 your ready to go kit will contain 2 rechargeable unbranded Makita style batteries
Option 2. For £675 you receive the same kit but with 2 Makita brand batteries
Prices correct as of September 2026 and may change
Both options contain 2 batteries compatible with other Makita power tools and one charger.
To make installation easier, the press tool features an integrated torch, an OLED status display and a 350° rotating head.
The complete kit arrives ready for use, covering the most common fitting sizes for domestic and light commercial installations. Its quick cycle time helps you complete consistent presses efficiently and move on to the next job sooner.
Our M-Profile press fittings range from M-Press is available from stock in many sizes & materials. Materials include stainless steel, carbon steel, stainless steel 304 & 316 as well as copper. Various sealing options are available to suit different processes, and many are WRAS (potable water) or DVGW (natural gas) approved. We also offer a range of press pipe and press tools.
Browse our Press Fit range here
Get started in seconds!
Save your details, view past orders, and enjoy a faster checkout every time.